
Proper Window Installation
This page is intended to create an understanding of the importance of a code-compliant window installation, to provide resources that will help you understand the process of installing windows properly, and to outline the types of windows available.
Window Installation Process
When discussing window installation it is important that everyone understands what flashing is. Flashing, in general, is basically just a thin piece of material that prevents moisture intrusion. When we are talking windows you'll need a window pan, head flashing, jamb flashing, and flashing terminations.
The flashing detail is critical to get correct because water is the #1 enemy of a structure. When building a structure we have to be concerned with four different moisture transport mechanisms and the effects of that moisture flow. Bulk water movement (rain, snow, or, in the case of foundations, groundwater), capillary action, air-transported moisture, and vapor diffusion.
In Colorado, and most parts of the United States, it is often the case that the humidity level inside a structure will be higher than the humidity level outside a structure, especially in the winter. This is important to note because the vapor in the air will condense on any surface at or below the dew point. Commonly, this is the case with the surfaces of window frames inside the wall cavity. You will never see this moisture because it is concealed, but it is there, and without properly installed flashing water will become trapped inside the structure.
Either the finished wall surface, or more commonly, the weather-resistant barrier (typically Tyvek with modern construction), and the flashing are intended to be completely integrated and continuous in a manner that encourages drainage at the proper locations. Furthermore, it is very important to acknowledge that this system is designed to deal with all four types of aforementioned moisture transport mechanisms. A break in the system or the inability of the system to drain properly generally guarantees moisture intrusion and its affiliated issues (rot/mold, etc.) at some point in the future. The lower the quality of workmanship and adherence to accepted installation practices, the higher the chance that we'll see issues sooner rather than later, and vice versa.
With that being said, here is the section of code that deals with window flashing installation, I've made bold some points that are especially important:
R703.4 Flashing. Approved corrosion-resistant flashing shall be applied shingle-fashion in a manner to prevent the entry of water into the wall cavity or penetration of water to the building's structural framing components. Self-adhered membranes used as flashing shall comply with AAMA 711. Fluid-applied membranes used as flashing in exterior walls shall comply with AAMA 714. The flashing shall extend to the surface of the exterior wall finish. Approved corrosion-resistant flashings shall be installed at the following locations:
1. Exterior window and door openings. Flashing at exterior window and door openings shall extend to the surface of the exterior wall finish or to the water-resistive barrier complying with Section 703.2 for subsequent drainage. Mechanically attached flexible flashings shall comply with AAMA 712. Flashing at exterior window and door openings shall be installed in accordance with one or more of the following: 1.1. The fenestration manufacturer’s installation and flashing instructions, or for applications not addressed in the fenestration manufacturer’s instructions, in accordance with the flashing manufacturer’s instructions. Where flashing instructions or details are not provided, pan flashing shall be installed at the sill of exterior window and door openings. Pan flashing shall be sealed or sloped in such a manner as to direct water to the surface of the Exterior wall finish or to the water-resistive barrier for subsequent drainage. Openings using pan flashing shall incorporate flashing or protection at the head and sides. 1.2. In accordance with the flashing design or method of a registered design professional. 1.3. In accordance with other approved methods.
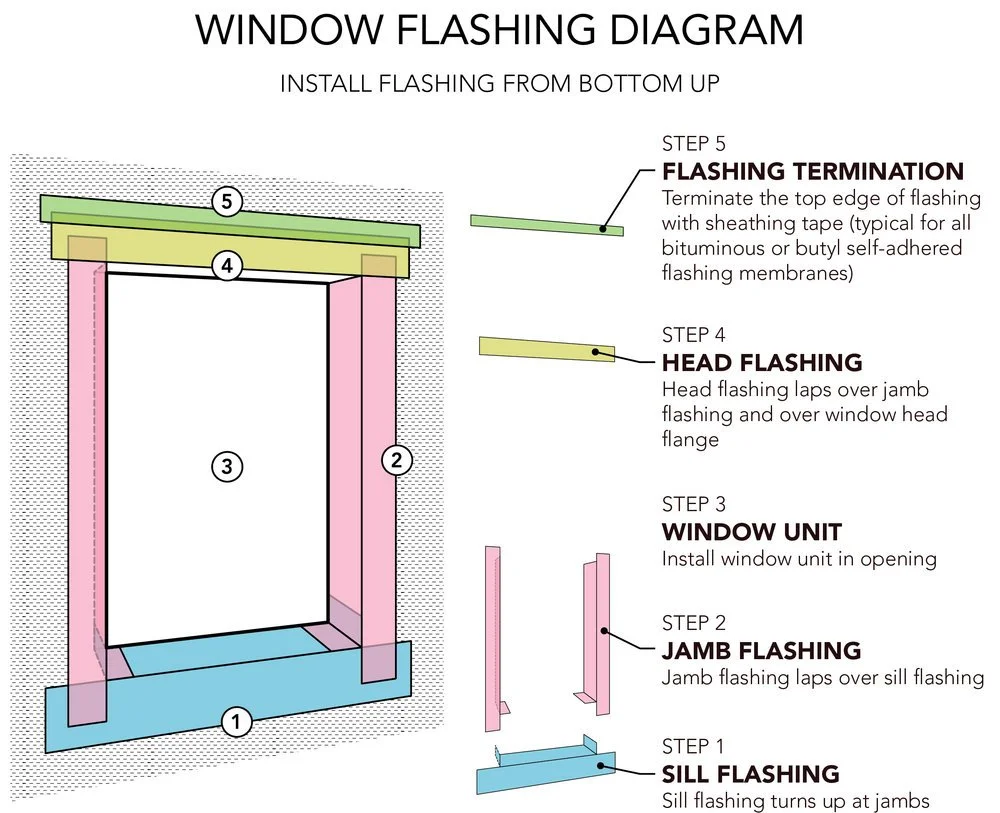
This diagram is helpful because of its simplicity, note how the flashing is installed in a shingle-like manner
I will now outline a very generalized installation technique. Both the window and the flashing will have tech specs and instructions available (oftentimes as a pdf that you'll have to get from the manufacturer's website). If you have access to them it is essential to read them, all parties of to a window installation should be aware of the installation procedure to ensure a proper installation. Many window manufacturers require certain products to be used when installing their windows, without using these specific products (often sealant, sometimes flashing, etc.) the window warranty will likely be void. It is good to ensure the instructions are being followed.
When flashing a window you basically work up from the bottom so that the flashing overlaps in the right order. This means you'd start by building the sill pan (a.k.a. pan flashing, blue in the diagram). Flexible flashing and, increasingly, fluid-applied flashing, are often used for this. It is important that the window pan has end dams (edges turned up) to prevent moisture intrusion where the jamb flashing meets the sill flashing. When I install a window I typically include prefabricated flashing corners under the window pan (i.e. install them first).

The AQUAMARINE colored plastic pieces in this photo show prefabricated flashing corners that I used in this installation. The pan flashing is then installed on top of the corners.

This image shows the installed pan flashing. Note how it makes a continuous transition from the Horizontal to vertical surfaces without breaks, interruptions or cuts in the material and extends up the jamb side.
After building the pan you need to flash the jambs using flexible flashing that extends from the WRB (water-resistive barrier), around and into the opening, and down onto the sill pan. When you do this you need to cut a small (~6") slit at the bottom of the flashing the distance of the width of the jamb from the edge of the flashing. The end of this slit will align with the corner created where the jamb and sill meet. Make all cuts including this slit before removing the material that will expose the adhesive. Then apply the jamb flashing so that it extends above the opening as shown in the diagram with the pink flashing components. If the house has already been wrapped with a WRB you can skip this step because the WRB is allowed to be used here as the jamb flashing. When this is the case I typically run the Sill/pan flashing a bit tall on the edges.
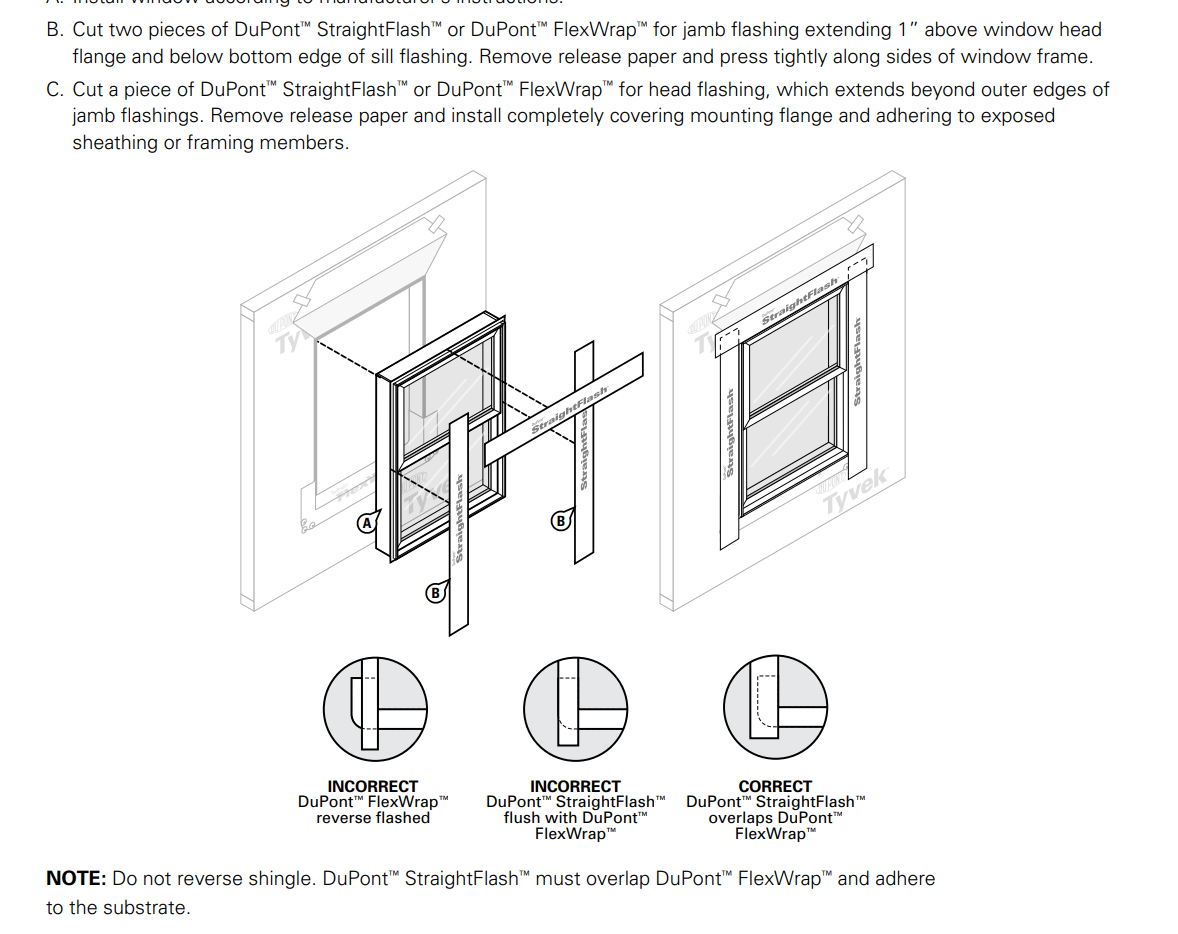
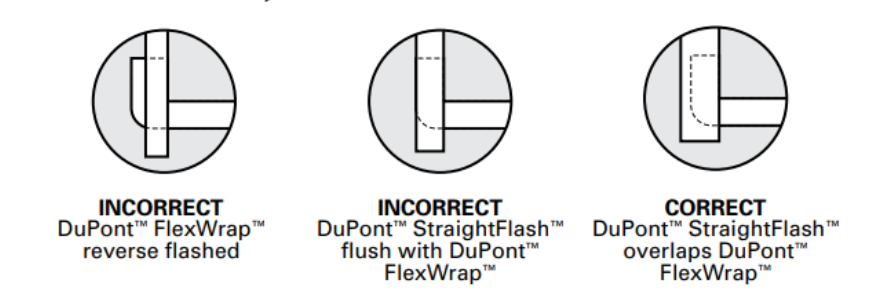
This screen grab from a Dupont installation guide shows that the flashing installation is slightly different for new construction with a WRB already installed. Note that flashing is still installed in a shingle-like manner.
Next comes the head flashing, Note that this goes on after the window is installed in the opening. Also, notice how it does not wrap into the interior? That is to prevent capillary action from carrying moisture into the structure. The weather barrier above the window may have moisture running down the inside of it, this is why the WRB and flashing are applied in a shingle-like manner. We want any water coming down the face of the structure to be routed to either exit the structure completely or we want to move it to the outside face of the WRB for subsequent drainage. When you're dealing with the exterior of a structure you always want to manage moisture intrusion but allow provisions for water to escape. This is also why you never caulk the bottom of anything on the exterior of a home. Water will get in regardless of our best efforts and it needs to get out.
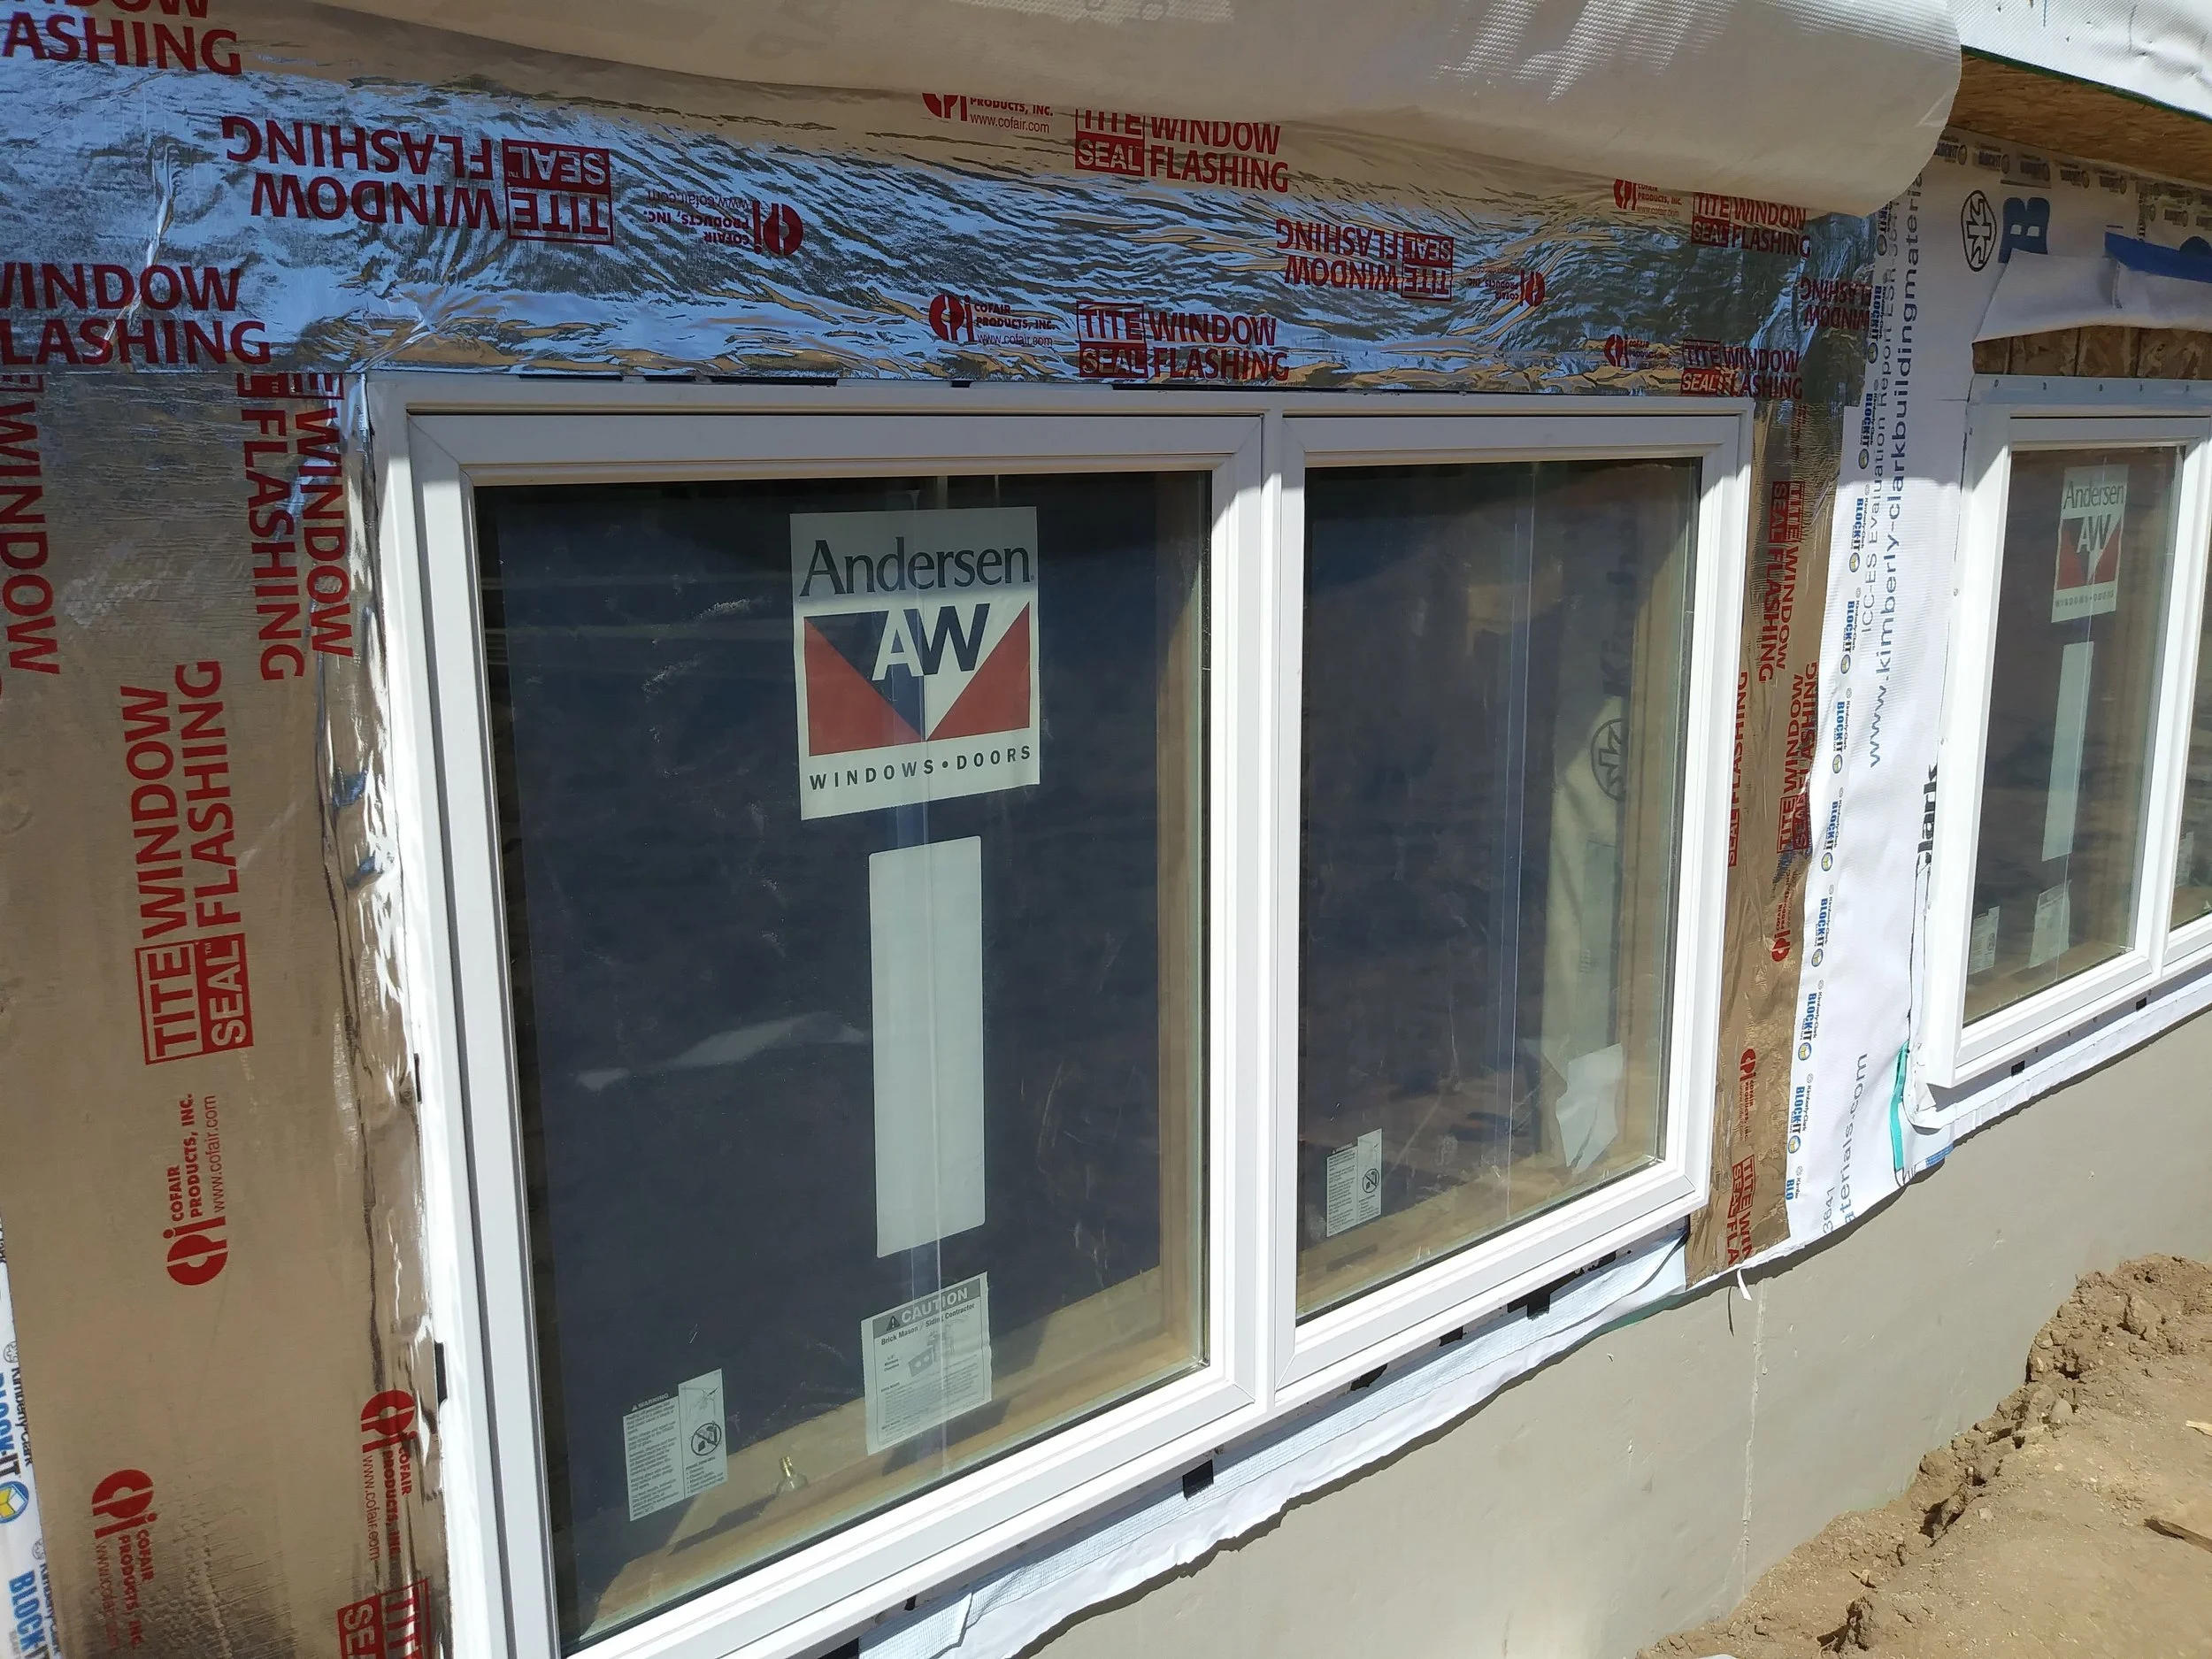
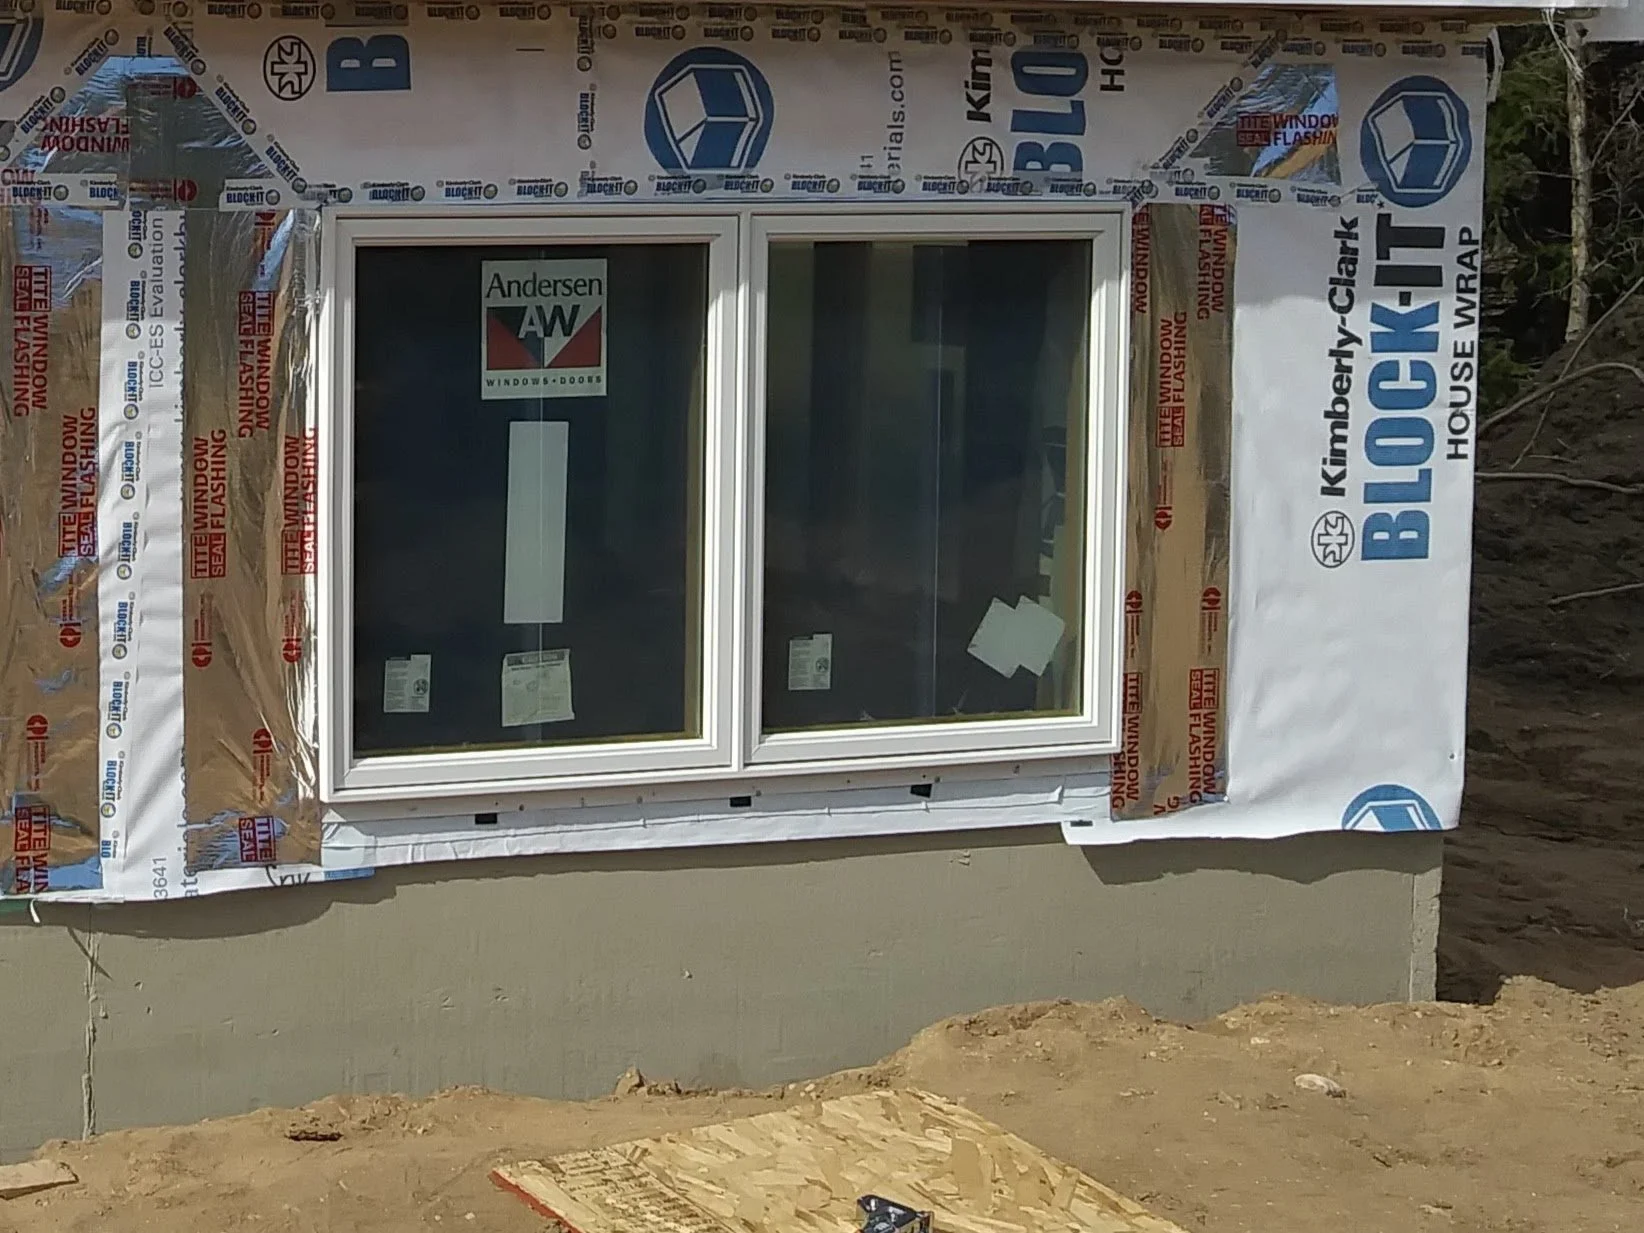
In this photo you can clearly see the way that the head should be flashed. Note with the window on the right I hadn’t flashed the window head and jambs yet so you can clearly see the WRB pulled up to allow the head flashing to be applied directly to the sheathing. the window on the left has been flashed and the WRB has not yet been placed over the flashing.
After completing the steps in the diagram above, with the exception of the head flashing, comes the window, which you'll embed in a high-quality sealant such as OSI QUAD (but check the window instructions, some manufacturers require specific sealant) by either applying it around the opening or directly to the nail fins. It is essential that you only apply sealant to the top and sides of the window and omit sealant from the bottom. Again, we never want to seal water in, we want to prevent moisture intrusion but allow provisions for water to escape. The window is then placed in the opening and secured in a plumb/level/square position. I like to slightly shim out the bottom nail fin to provide a ~1/32-1/16” gap to allow for the free flow of moisture out of the fenestration.
Possibly the #1 mistake that window installers make when flashing a window is to seal the bottom nail flange to the opening. you want no sealant on the bottom nail fin and never cover the bottom nail fin with flashing! Sealing the bottom of the window defeats the purpose of flashing and ensures moisture will be trapped in the wall cavity.
After the window is in place it is time to apply a strip of self-adhesive flashing to cover the nail fins on either side of the window. Note that this flashing should extend to completely cover the exposed pan flashing where the two intersect.
Jamb flashing must completely shingle lap the pan flashing at the intersection.
This window installation is finished. note the shims which allow for a small drainage gap at the bottom of the window and the absence of any sealant or flashing on the bottom nail fin.
The last step in the diagram, flashing termination, serves as counterflashing. It's essential if your head flashing is metal and it's a good idea if you are using flexible flashing. This can be Tyvek tape or something similar. On new construction or when a house is to be re-sided, it's usually the flap of WRB that is left when cutting the windows. This step is difficult to impossible on window replacements in a brick veneer building (unless you remove the brick); in this scenario, it is essential to use the highest quality flashing material available to ensure the installation will stand the test of time.

Note the WRB (block-it) acting as counterflashing.
If applying trim around the structure it is important and required under R703.8.4 that the trim itself requires flashing. This flashing typically requires an end dam and must be sloped to allow water to drain away from the structure. Also, note the code makes no exception for the location of the trim, it is literally all projecting wood trim regardless of if it is projecting at the top or bottom of the window (or anywhere else for that matter). Personally, I flash all interruptions in the cladding system that the cladding did not lap over notwithstanding projections. The following diagram illustrates flashing head trim:
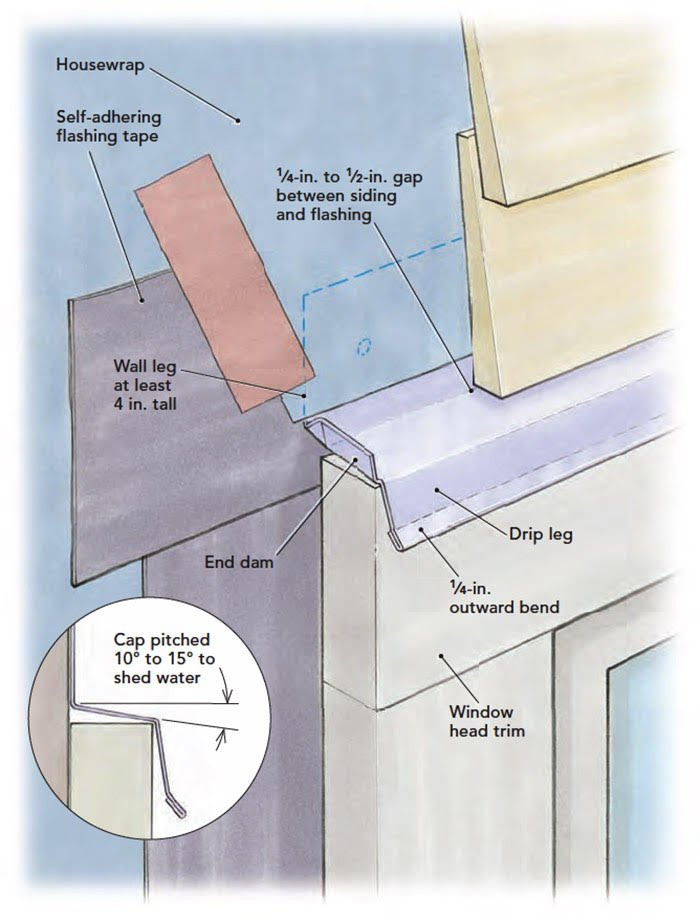
This detail is essential, but frequently missed or executed poorly.
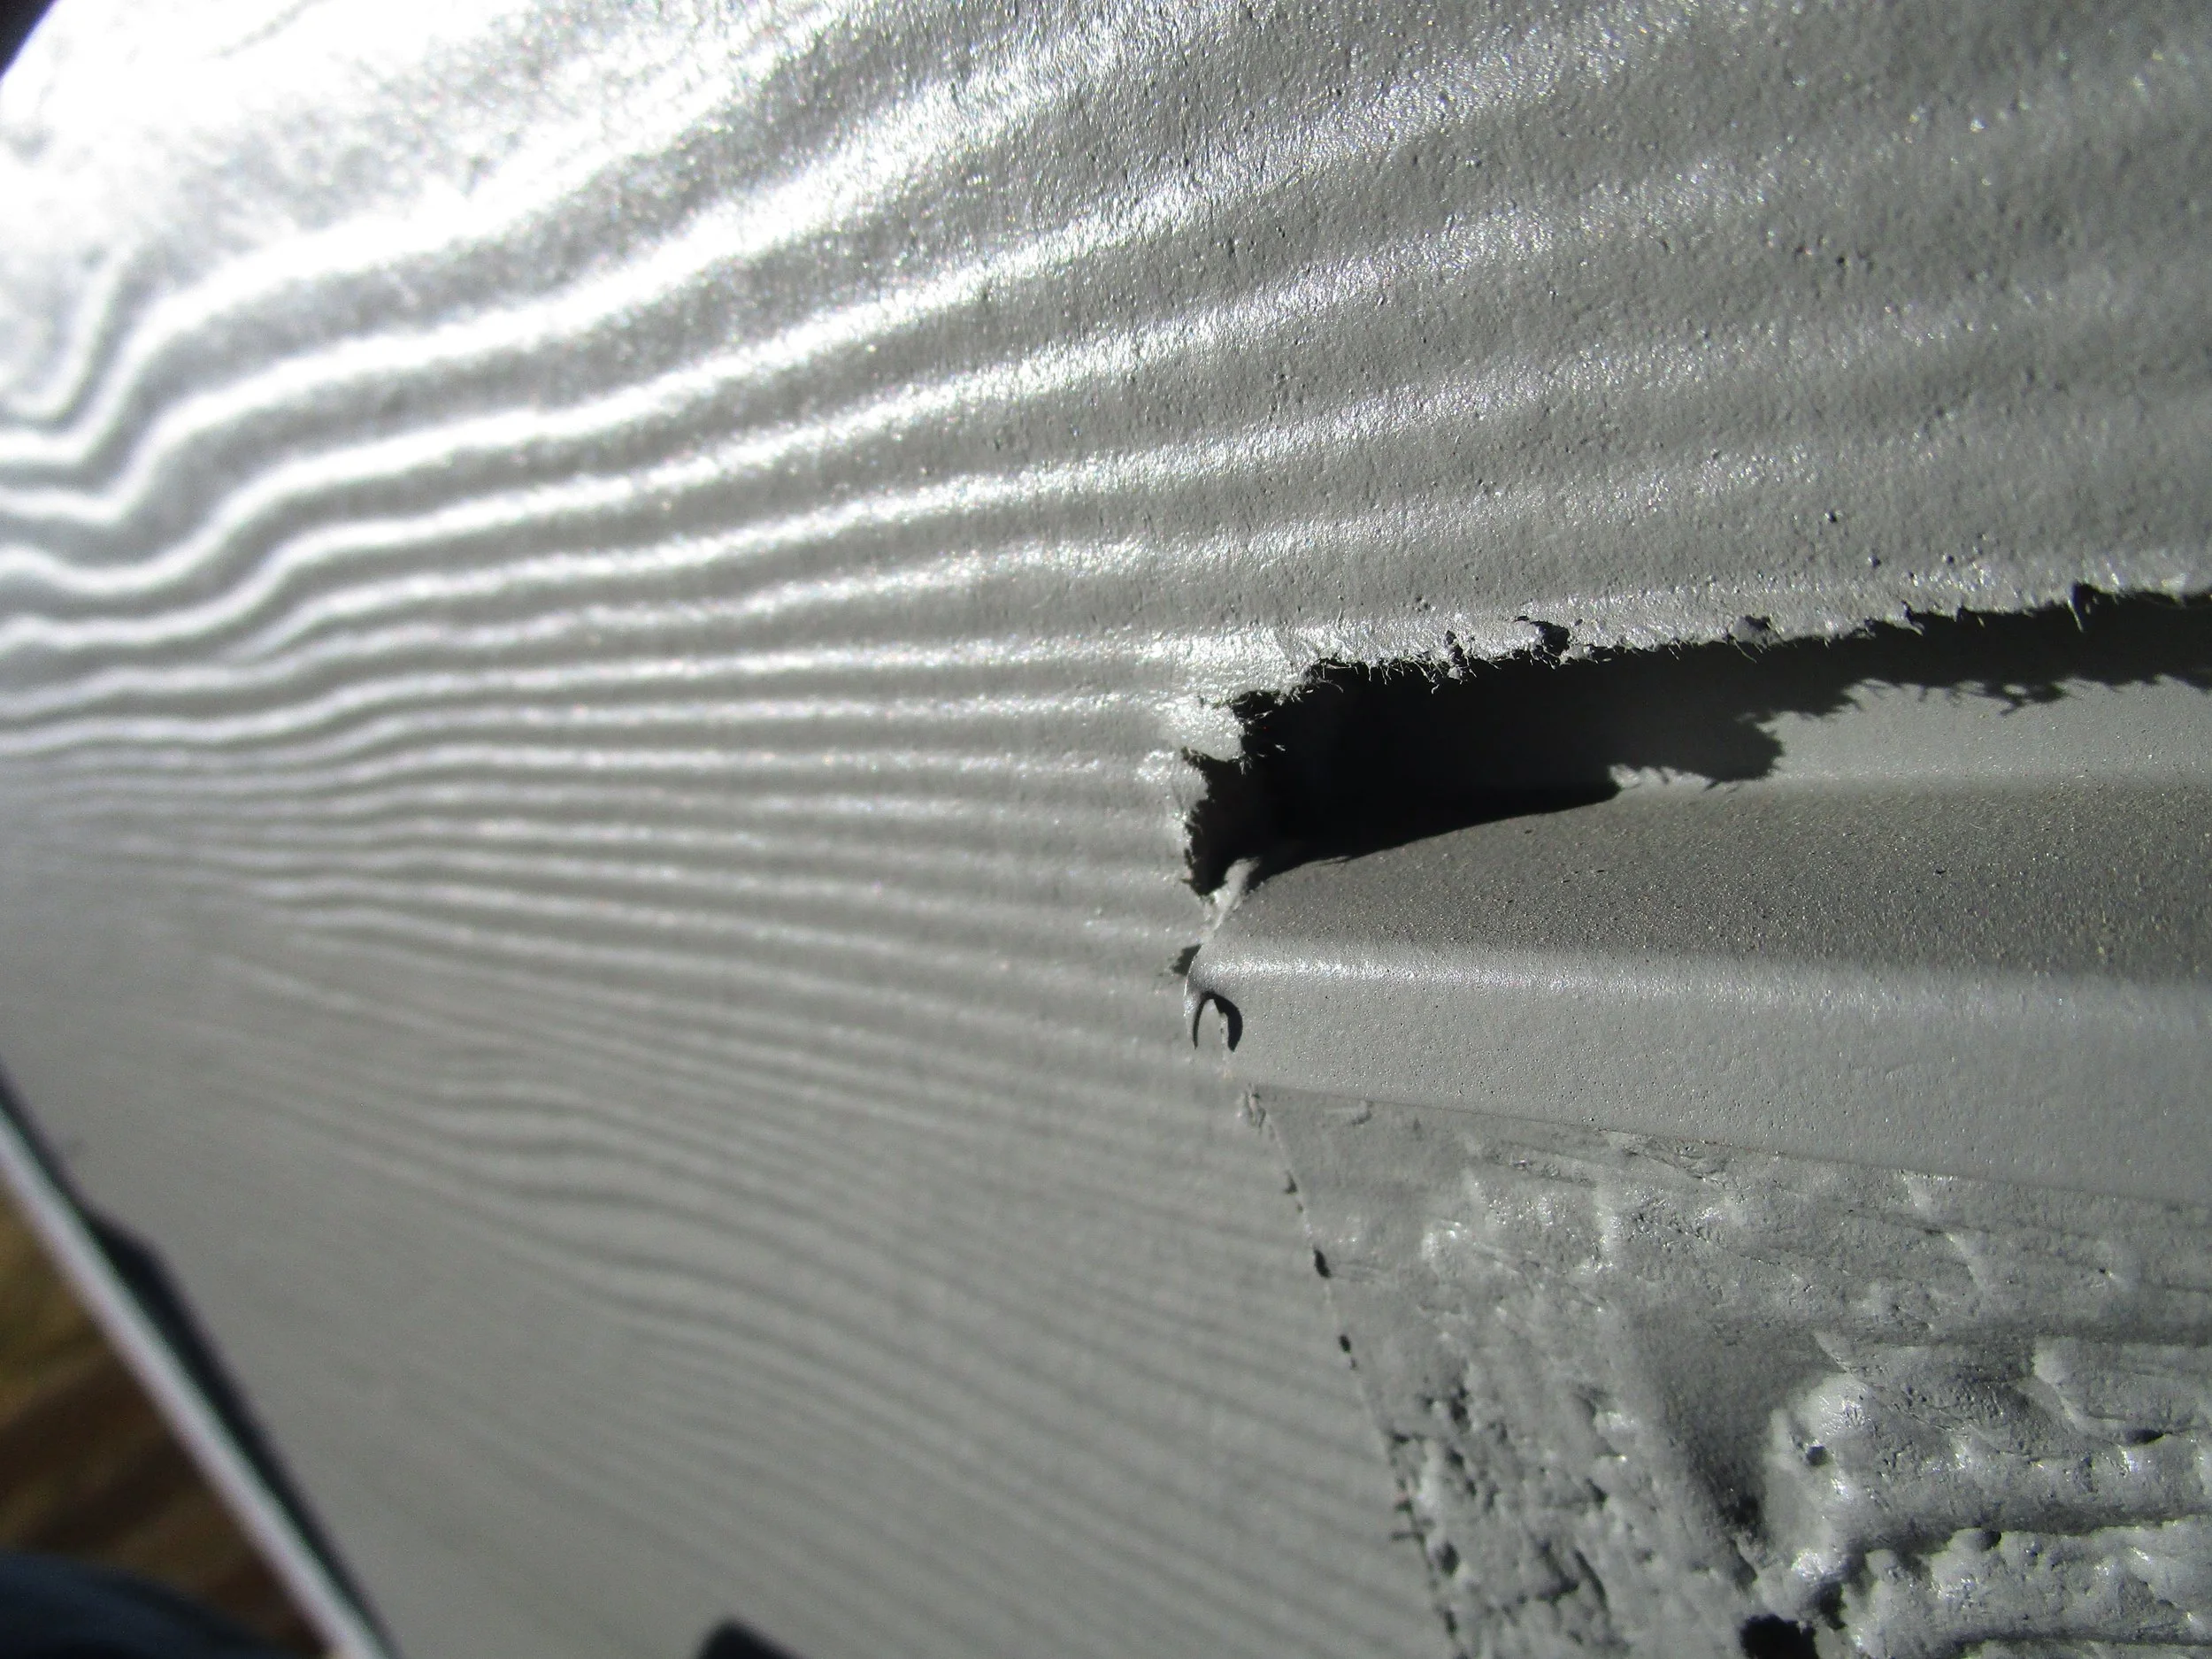
I took this photo while inspecting a new house built by Richmond American Homes. The drip cap flashing in most locations of this house was not bent out by the installer, in fact, it was pitched back into the structure meaning it was basically scooping water into the wall, additionally, it was cut short and had no end dam (a.k.a. wall leg). The presence of a material does not indicate proper installation.
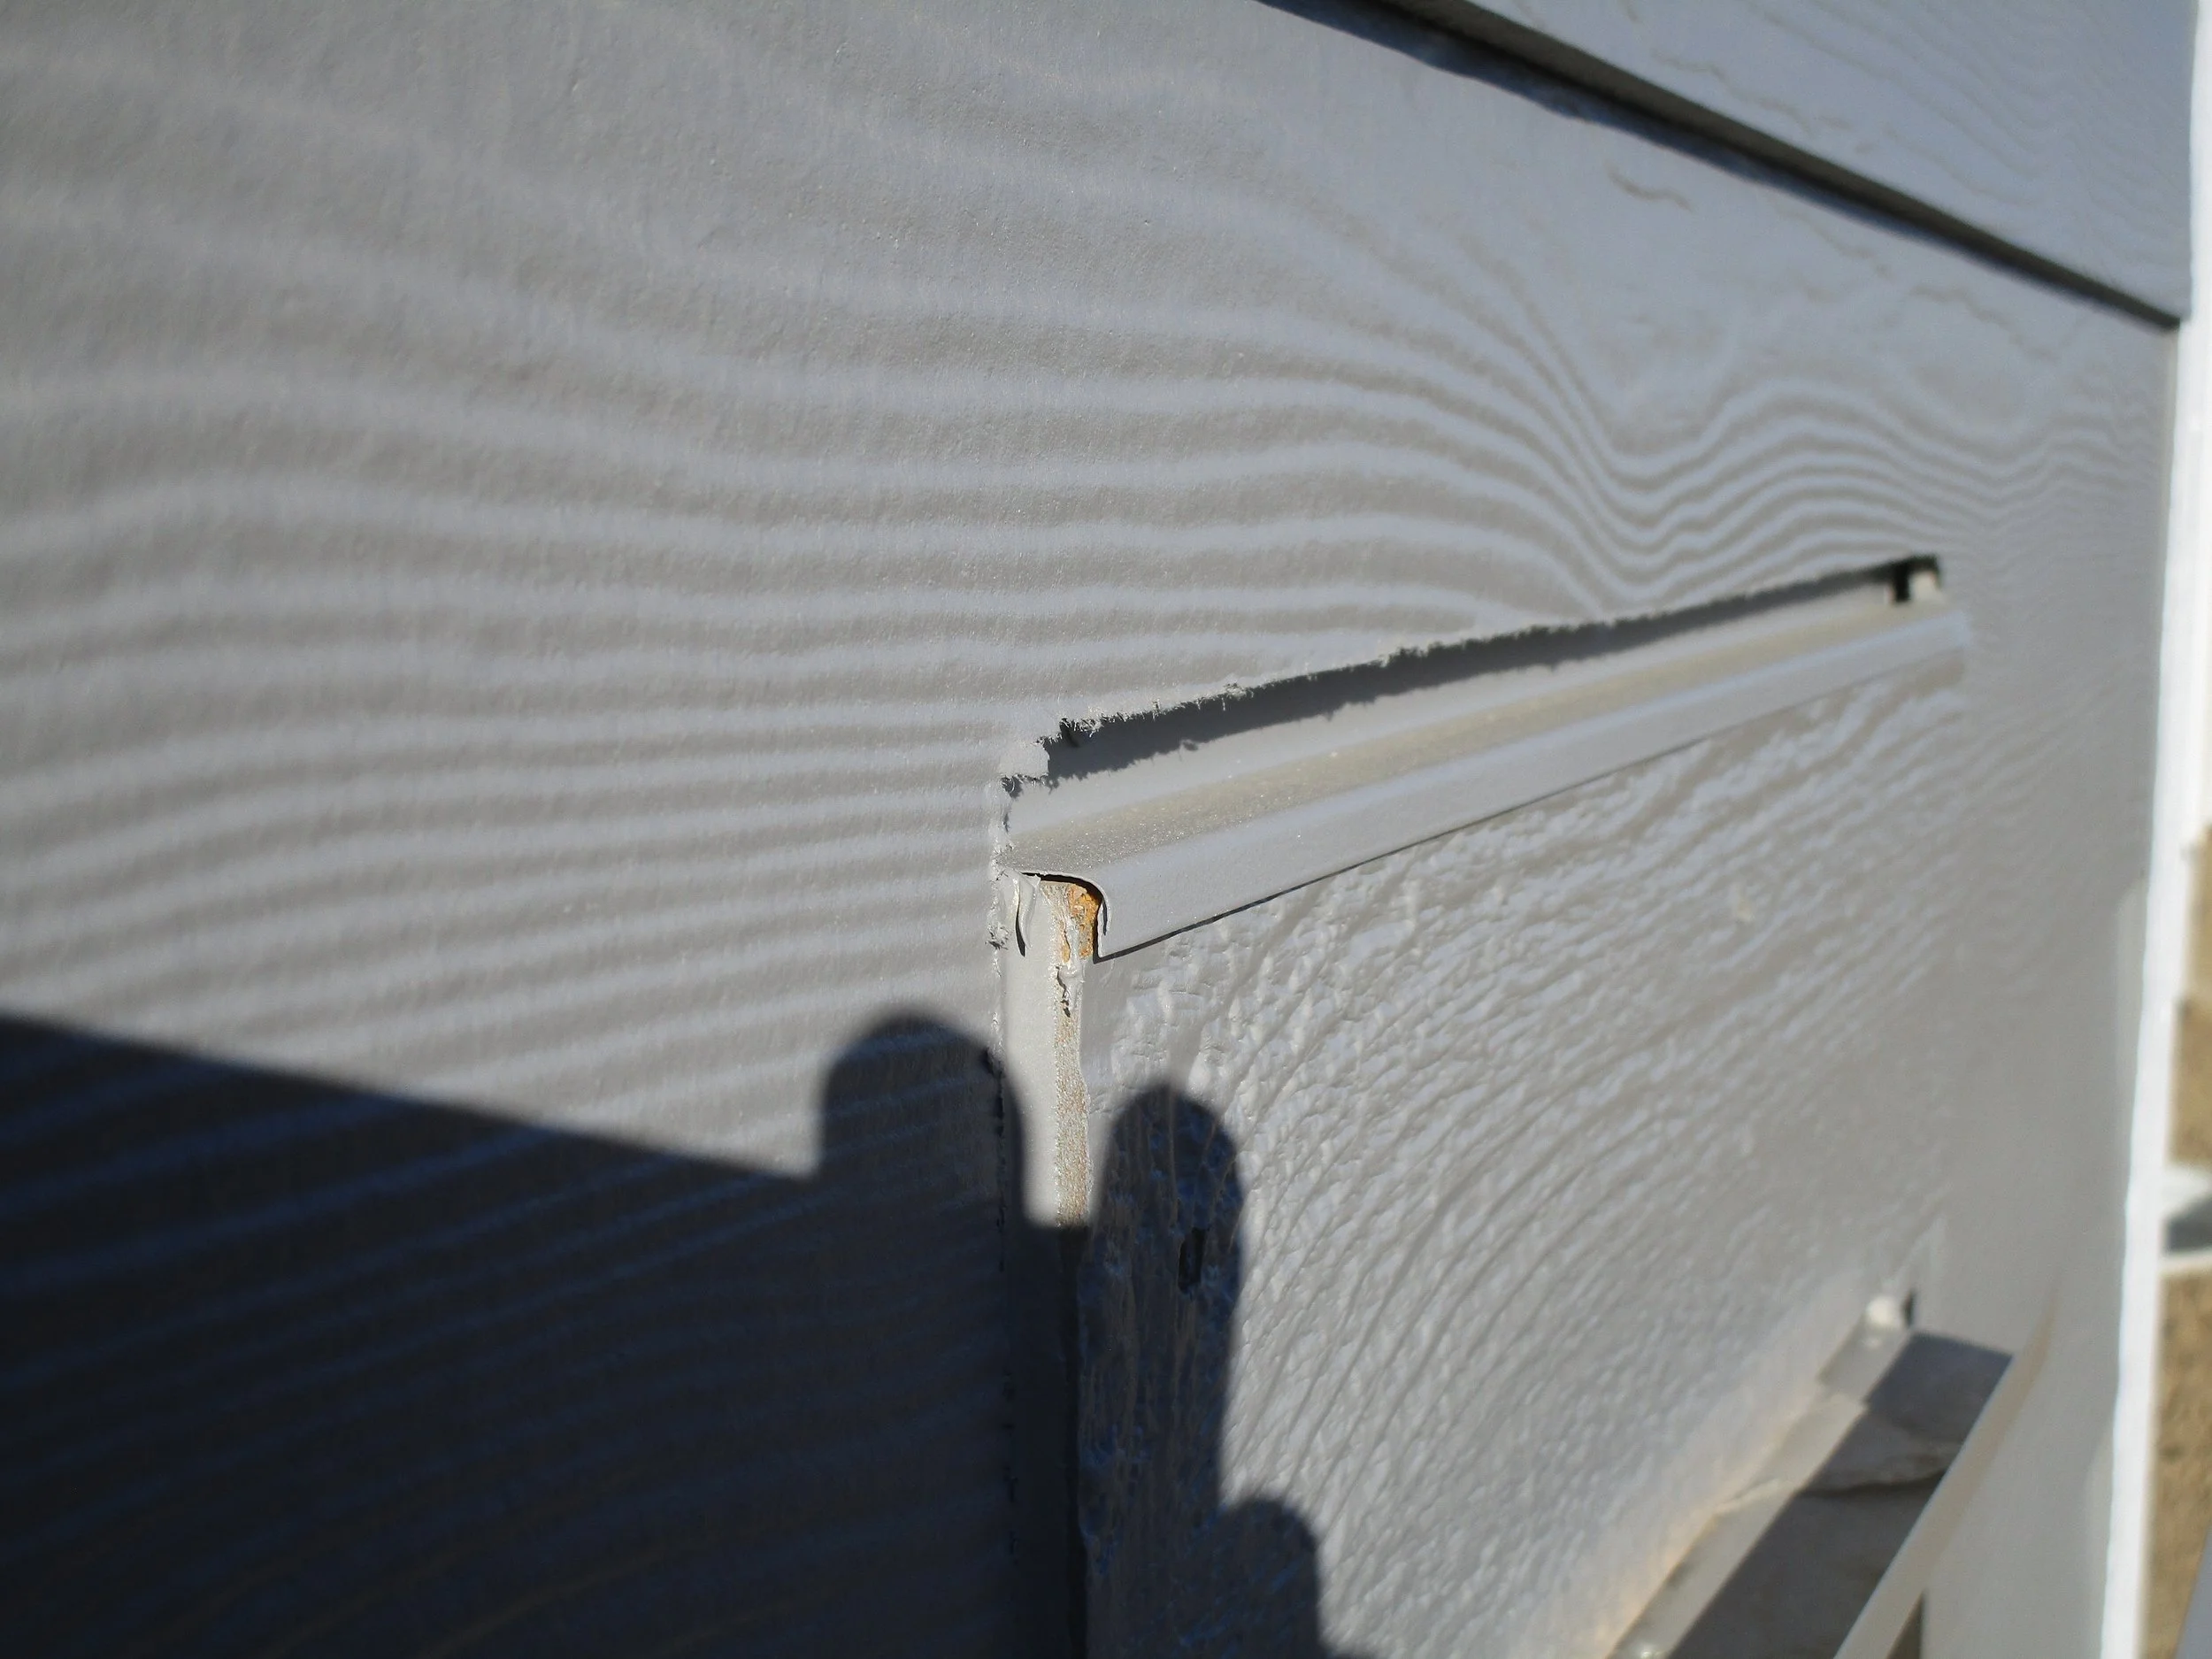
This is another photo of the same improperly installed flashing, on the right side you can clearly see that moisture is being directed into the structure.
Why Can’t I Just Caulk it & Call it Good?
A point that needs to be made clear is that caulk is not weatherproofing. Caulks and sealants have a service life that is typically much shorter than that of flashing. Additionally, caulk lacks the surface area with proper installation to have reliable adhesion for long-term installations. Flashing is the only correct method for weatherization of terminations and penetrations including hose bibs, electrical boxes, etc. It is important to note that there are commonly available fluid-applied flashing products such as Fast Flash which can be substituted for self-adhesive and metal flashing.
Caulk is a first line of defense but is primarily aesthetic. Caulk can, and often does, do more harm than good. This company wrote an article that does a pretty good job of explaining where to caulk and where not to, I think it's worth a read with the note that often things that aren't flashed should be, before painting it's best to address that.
Window Types
As for the windows, themselves, there are generally 3 kinds: block frame, full frame, and flush frame.

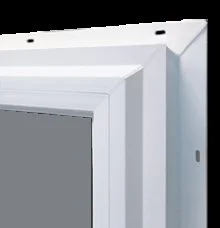
This Image shows a typical block frame window. Note there is no barrier to moisture intrusion integrated into the window.
Block frame windows do not have a nail fin. They are designed to be used when a wood or metal window frame that is properly flashed is left in place. Note that the installer should always determine the presence of proper flashing. Older homes were not always built to high standards and flashing may be insufficient. Block frame windows are sometimes also used in a structural masonry building when the flashing has been incorporated in the fenestration design. They cannot be used in the same manner in masonry veneer structures. Unfortunately, block frame windows are frequently misused and sold to homeowners who don’t know any better as “replacement windows”.
The correct use is to remove the sashes from a correctly installed window frame and retain the frame. This allows the flashing to be left undisturbed and simplifies window installation. This is often referred to as a pocket replacement. See this video for further explanation.
There are installers (and even some shady manufacturers) that claim these can be used for a full window replacement; they cannot. The consensus among building science experts is that using block frame windows that way does not meet code, and is far from best practice. Reputable, but not all, manufacturers also state that block frame windows are only for use in a previously flashed frame. This article is an example of a manufacturer stating this.
You should understand that not all applications require code compliance (shed, playhouse, un-permitted backwoods cabins, etc.) so manufacturers are free to claim what they like. Typically the warranty covers the window, not your house, and offers the exception that the window must be installed according to building code. Building code requires flashing in a shingle-like manner, so that's something to consider. Generally speaking, nobody is on the hook for rot or other moisture-related issues if you choose to have windows installed this way.
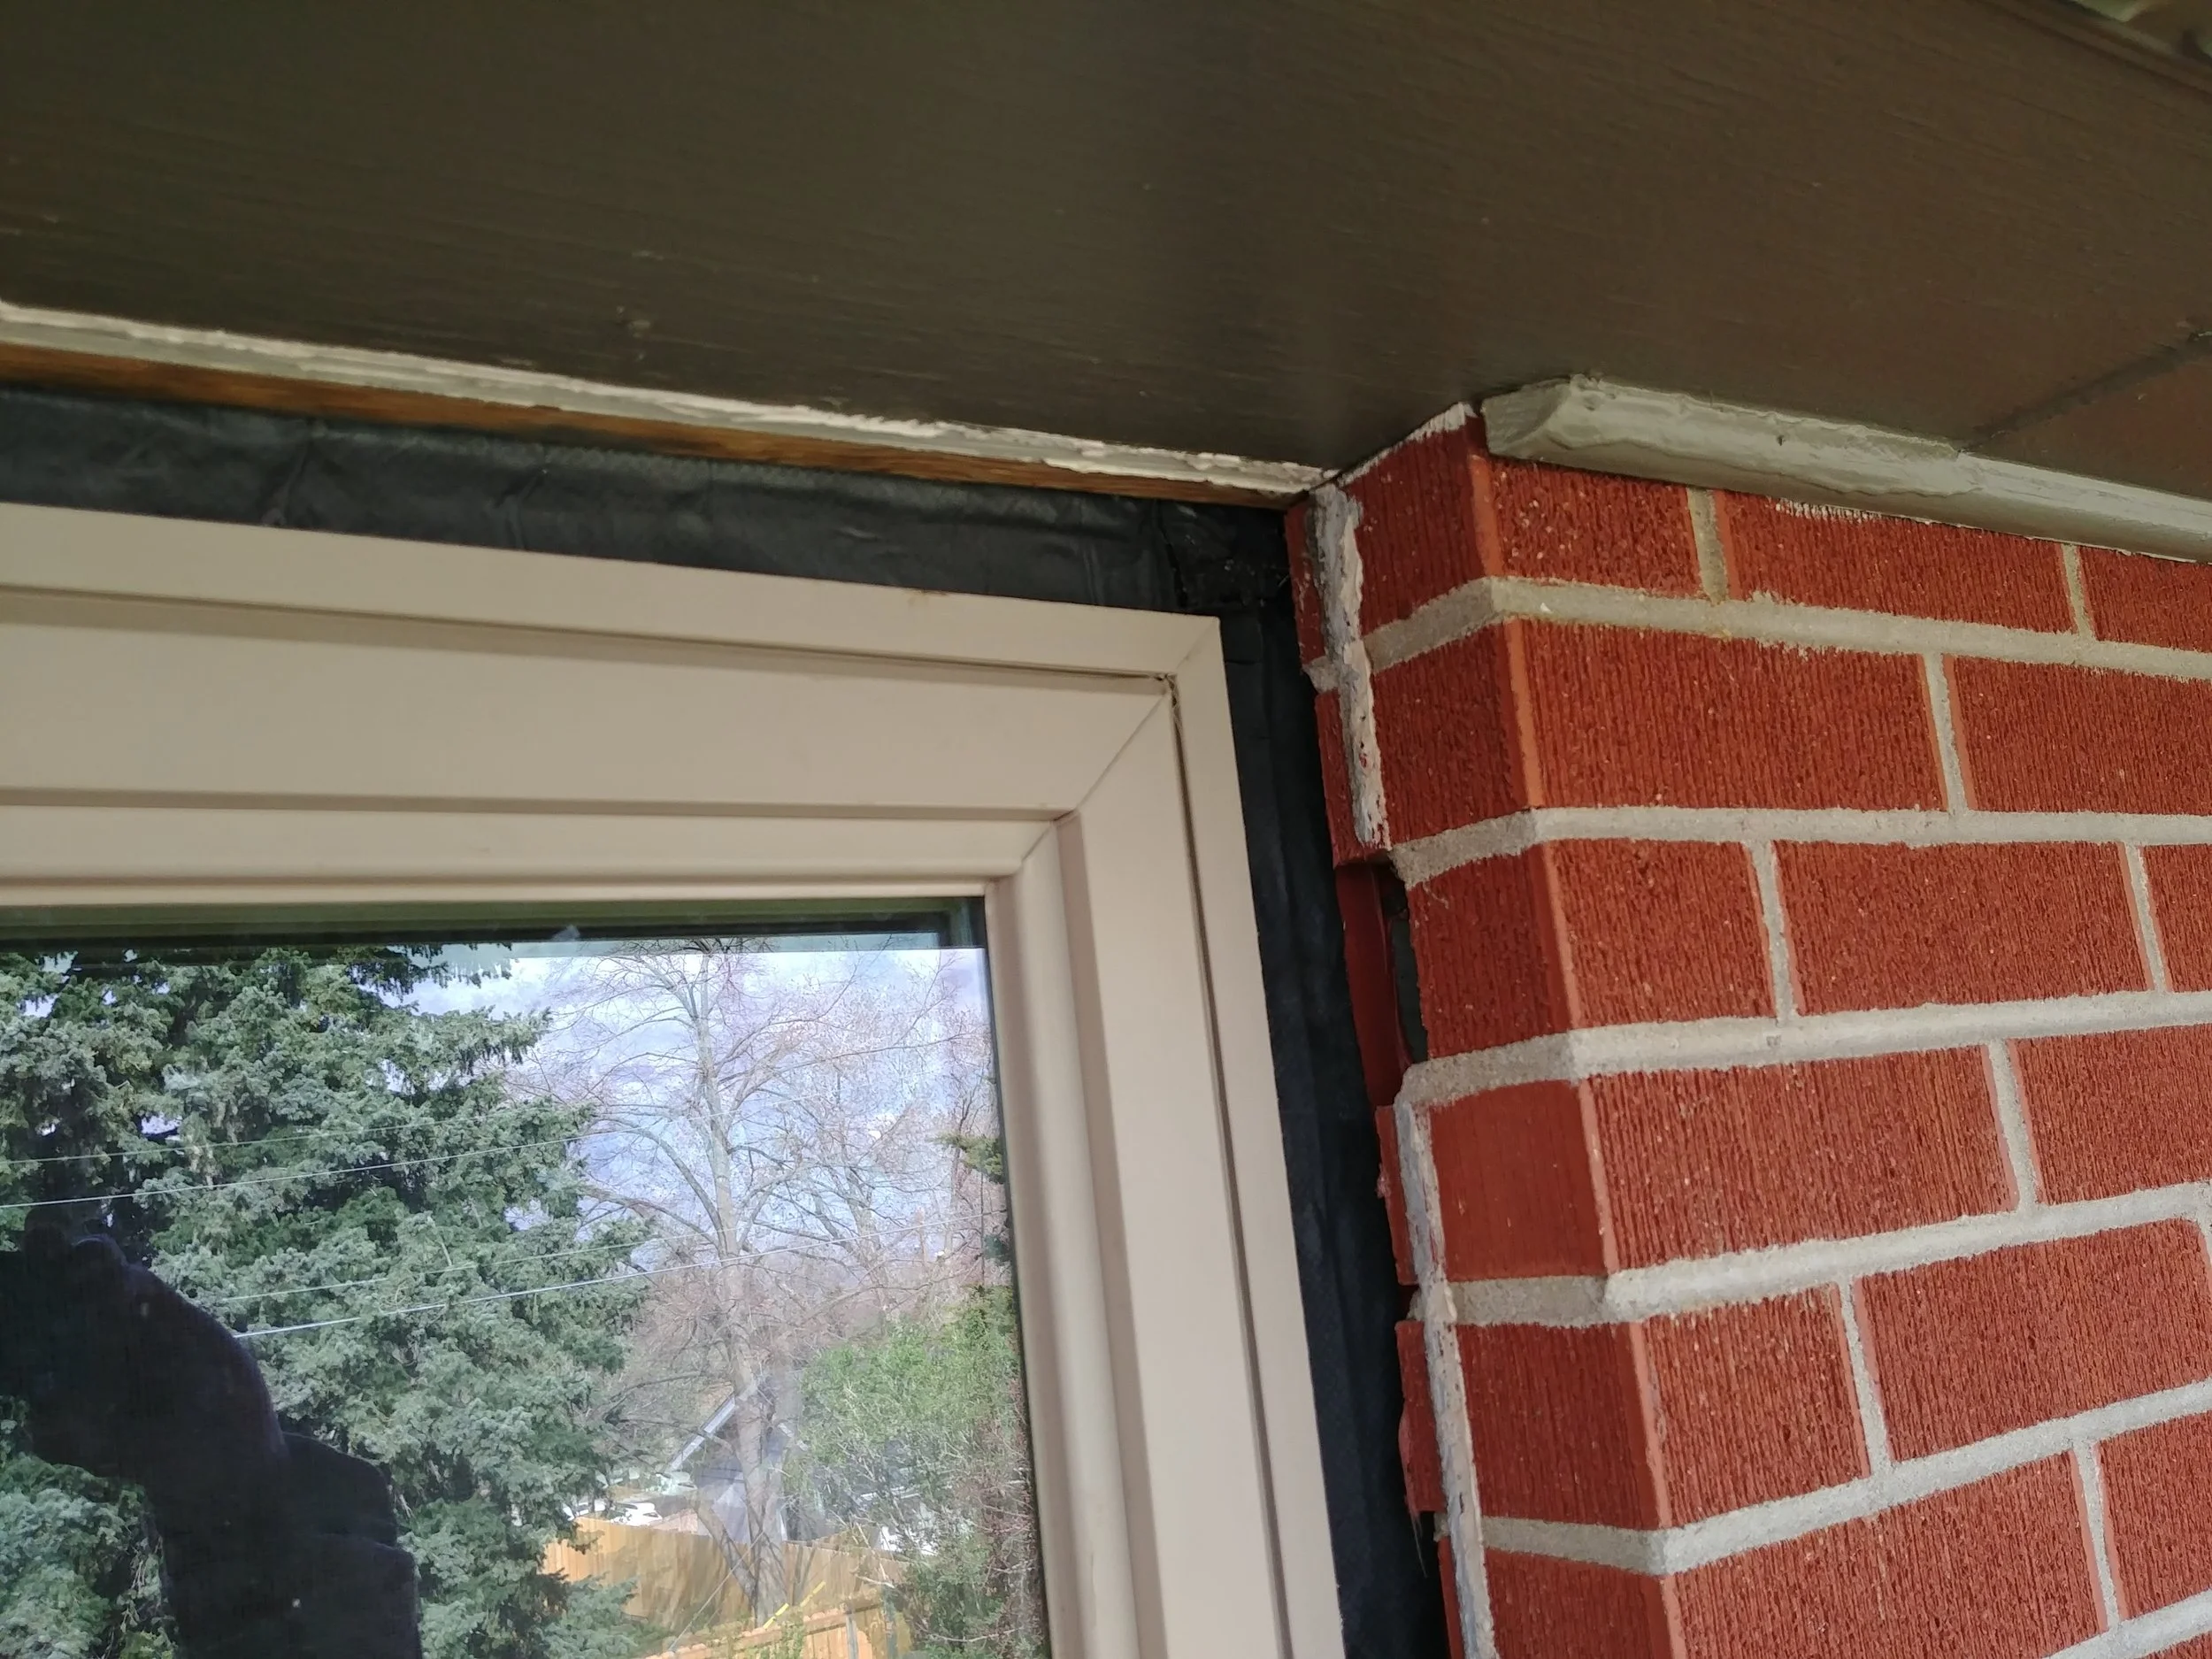
The image below, while somewhat blurry, helps to illustrate the issues with a block frame replacement where no existing flashed window frame is intact. What you are looking at is the corner of a window I was in the process of replacing. This window had no flashing and nothing acting as a thermal barrier around the window. Unfortunately, this is fairly typical of a low-quality window installation. The only measure taken for preventing moisture intrusion was a bead of caulk sealing the window to the brick. Unfortunately, this caused the window to drip condensed water down the interior face of the brick veneer which led to cracks in the mortar in the area around the window. Also, note that the caulk had failed allowing air and moisture intrusion.
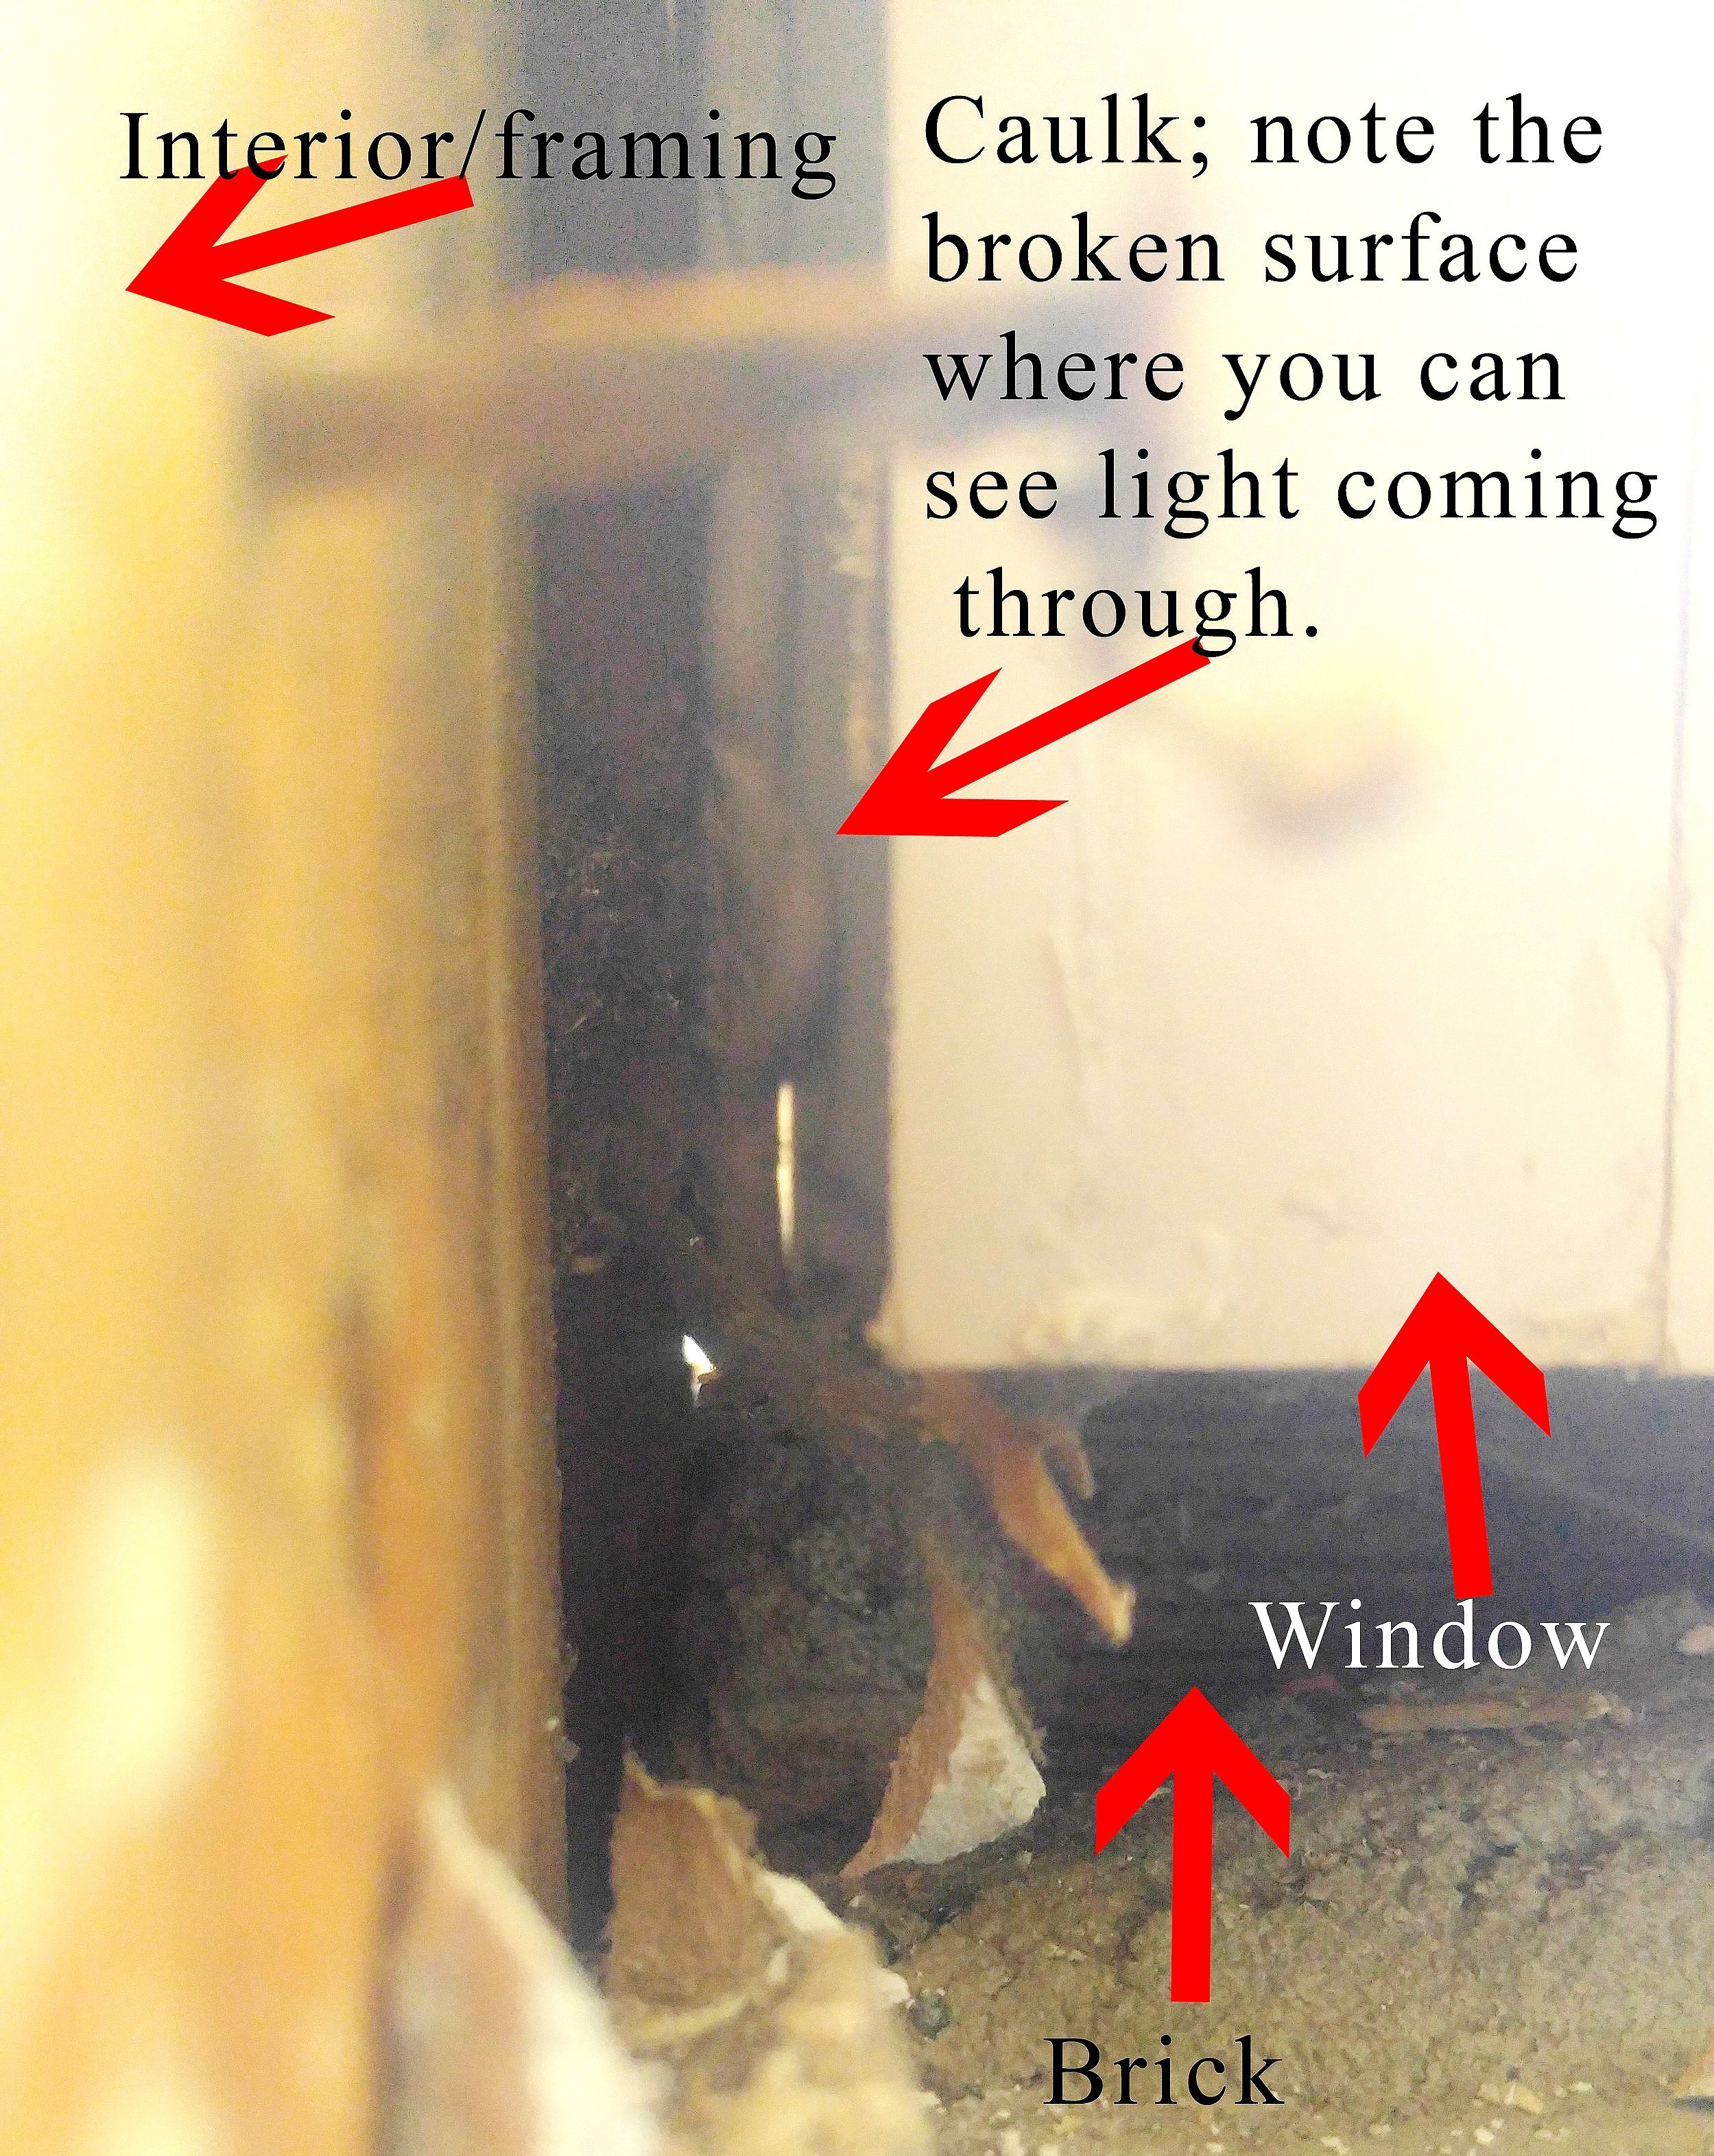
This Image shows the corner of a window i was in the process of replacing. This window had no flashing and nothing acting as a thermal barrier. The only attempt at weatherization was a bead of caulk which eventually failed. Note the light coming through.
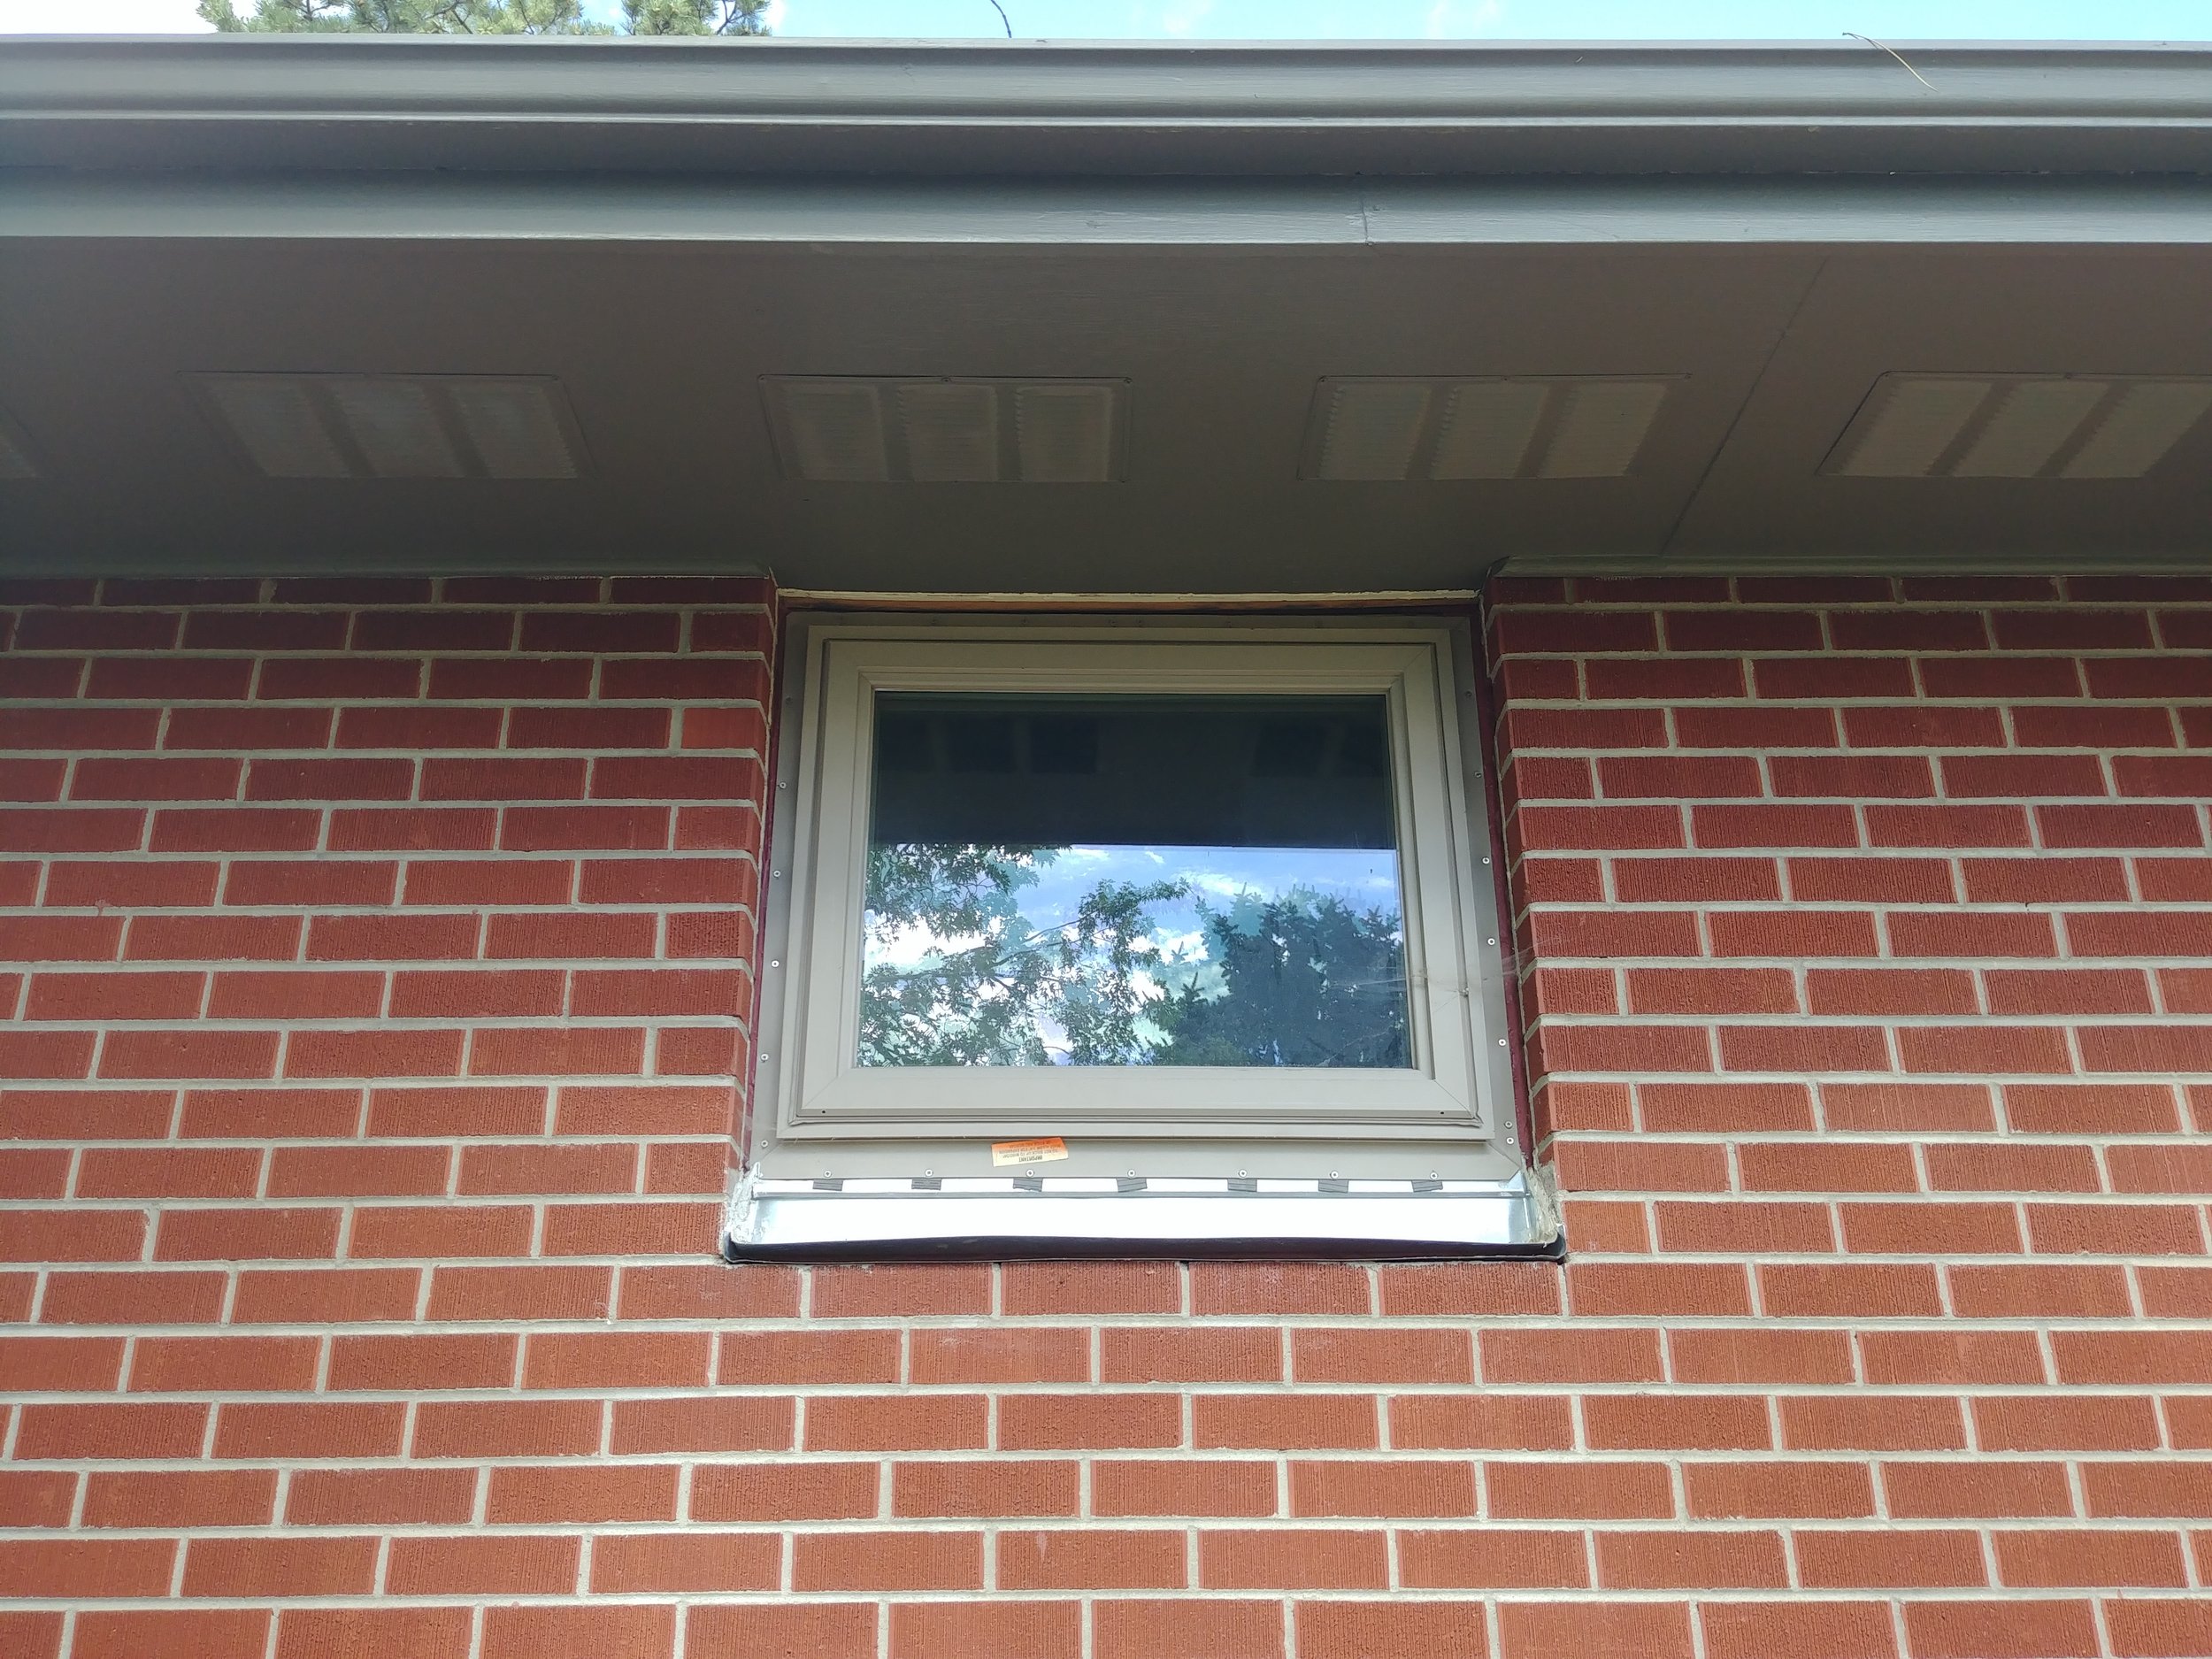
Full-frame windows, pictured to the right, have a nail fin and are used for the installation as described above. This is the proper way to replace a window when a properly flashed window frame is not present. Below is a picture of an in-progress installation photo from a full-frame window replacement in a brick veneer home. You can clearly see the nail fin, which is the tab that sticks out from the window and is used for fastening the window in the opening.
This is a full frame window.
Here is the same fenestration as shown in the previous image. To minimize the removal of brick, the fenestration was made smaller with treated 2x4 lumber which was integrated into the Celotex sheathing with a fluid-applied flashing. This allowed for the installation of a full frame window which was flashed in a manner that drained to the exterior of the brick surface. a Rowlock and brickmould moulding (not pictured) was installed over the flashing to ensure a good appearance.
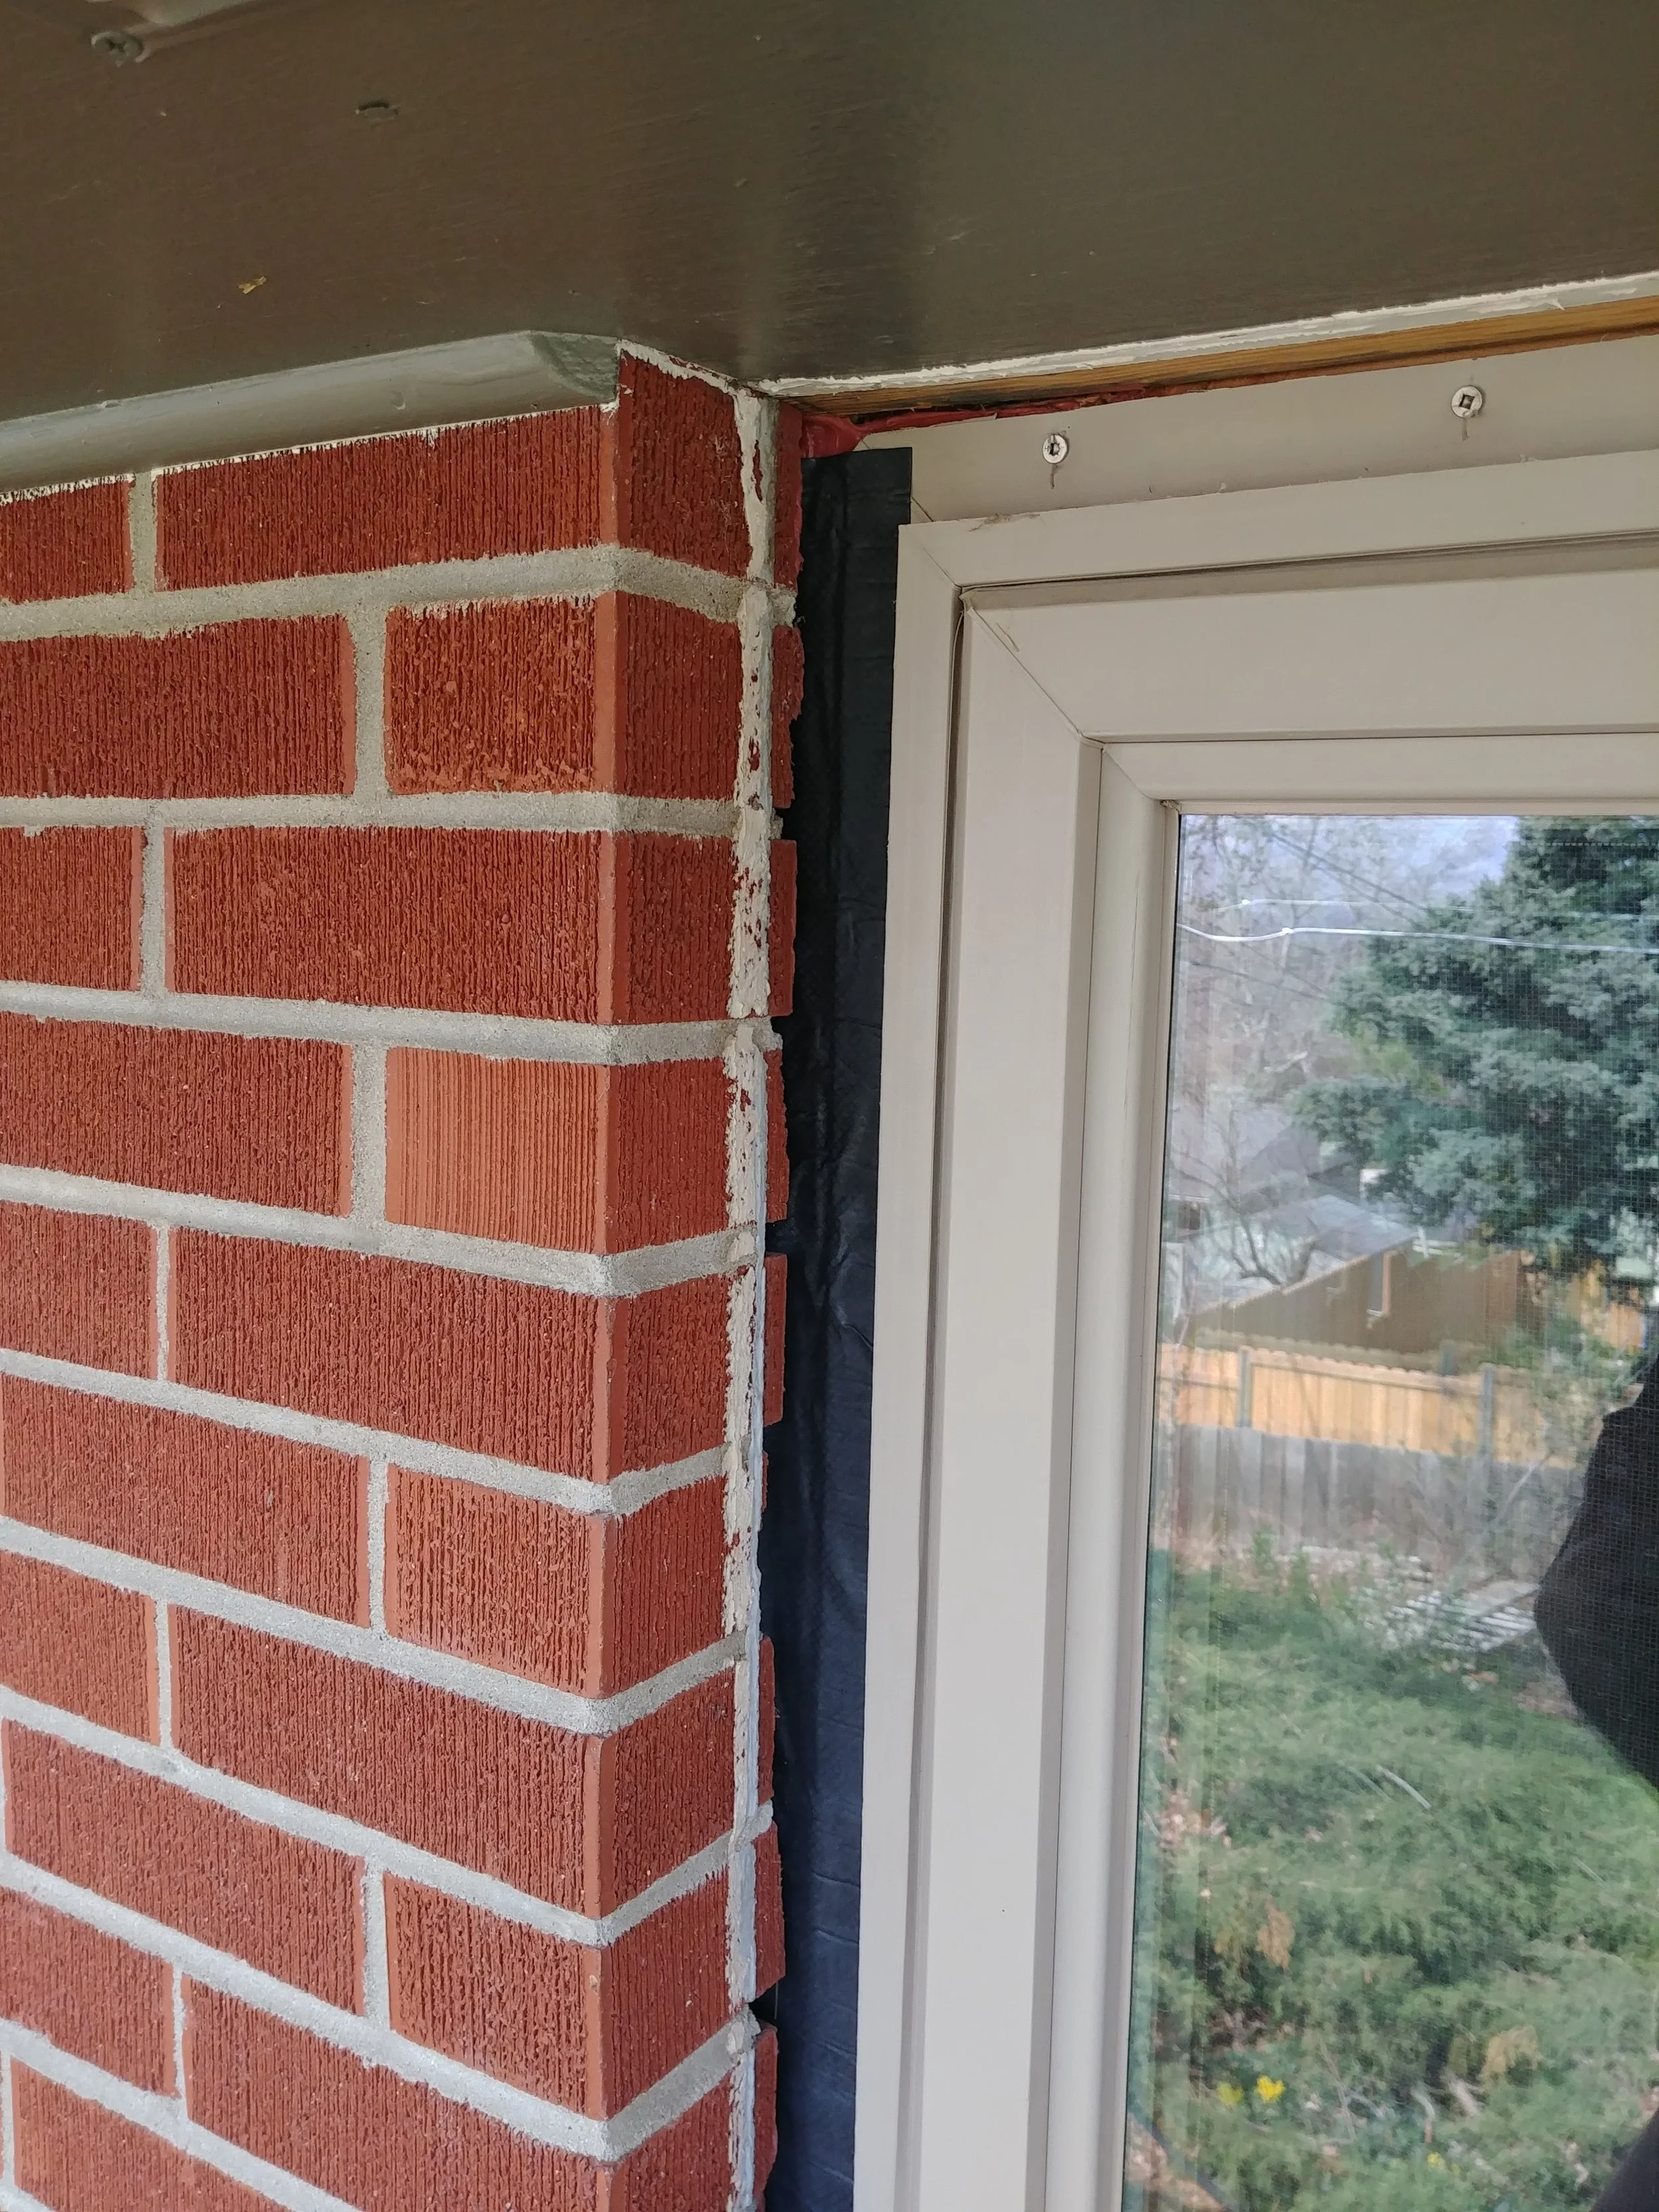
This photo shows how the self adhesive jamb flashing (black) is tucked behind the brick veneer before the moulding is applied.
This photo helps to illustrate the 2 layers of flashing at the jambs, the red flashing is a fluid applied flashing called Fast Flash, it extends on to the surface of the sheathing. The black flashing is Self adhesive flexible flashing.
Flush frame windows aren’t very common and have a specific application. They have a fin that laps over the stucco on all sides and the window gets imbedded into sealant. These are manufactured for use only with stucco. They still require flashing. The sealant must comply with the requirements of both the stucco and window manufacturer. This type of window is not recommended for use with brick/brick veneer, though I have seen them improperly installed that way. Brick is porous, so it's impossible to flash to it without cutting into a mortar joint. Installing a flush frame window over brick leaves the window open (pun intended) for moisture-related brick damage as condensed vapor would likely drip onto the interior face of the brick veneer if the window was not flashed properly. I’ll add that flashing properly would be more of a headache than with a full-frame window.
Please feel free to reach out if you have any questions.
Additional Resources:
Fine Homebuilding has a series of videos that explain an installation of a full-frame window in a masonry veneer structure, here are the links.
Flashing the opening: http://www.finehomebuilding.com/2012/06/19/how-to-flash-a-window-rough-opening-in-an-existing-brick-wall
Installing the window: http://www.finehomebuilding.com/2012/06/19/video-how-to-install-and-airseal-a-new-window-in-an-old-brick-wall
Installing trim: http://www.finehomebuilding.com/2012/06/28/how-to-install-a-pvc-exterior-casing-on-a-window-in-a-brick-wall
This video may help you understand the installation in your home if you have siding: https://www.youtube.com/watch?v=v2bzfpRgCEA